Set Up Your Facebook Marketplace Auto Lister
Bulk-post to Facebook Marketplace from a CSV — pick your accounts, upload, and the extension posts everything automatically
Upload your inventory once, choose which accounts post it, and the extension publishes every listing for you — automatically.
Step 1: Sign Up
Sign up for an account to unlock the dashboard. There are some free credits and no credit card is needed.
Step 2: Install & Open the Extension
Install the GetReplyNow Chrome extension, then open it and sign in. As soon as it's running, your logged-in Facebook accounts show up in the dashboard, ready to pick when you upload. The dashboard prepares your listings; the extension publishes them on your behalf.
Step 3: Prepare Your CSV
Your CSV is the source of truth for every listing. The core columns are title, price, condition, category, and description. You can also add optional columns: location, pickup_preference, availability, a scheduled_at time to post later, an image_url link, and target_fb_user_id to send a row to a specific Facebook account. The sample CSV below already includes every column so you can see the format.
Good news: your title, price, and description can be written in any language — Facebook Marketplace will accept them as-is.
Important: the values in condition and category must match Facebook's English dropdown options exactly, because the extension clicks those dropdowns for you. The allowed values are fixed.
Allowed condition values
NewUsed - Like NewUsed - GoodUsed - Fair
Allowed category values
ToolsFurnitureHouseholdGardenAppliancesVideo GamesBooks, Movies & MusicBags & LuggageWomen's Clothing & ShoesMen's Clothing & ShoesJewelry & AccessoriesHealth & BeautyPet SuppliesBaby & KidsToys & GamesElectronics & ComputersMobile PhonesBicyclesArts & CraftsSports & OutdoorsAuto PartsMusical InstrumentsAntiques & CollectiblesGarage SaleMiscellaneous
Don't start from scratch. Grab our sample CSV, open it in Excel or Google Sheets, and replace the rows with your own listings:
Download sample CSVPro tip: save your file as CSV (UTF-8) to keep non-English characters intact in titles and descriptions.
Step 4: Prepare Your Images
Add photos to your listings right from the dashboard — there are two ways to do it, so you don't have to rename files or match them to CSV rows by hand.
Two ways to add images
Pick the exact photos for each listing yourself, right in the dashboard. Use this when every item needs its own specific images.
Each listing gets N randomly-picked images from your pool. Use this when any image in the pool can represent any listing (for example, generic stock photos of a product line).
Step 5: Organize with Groups (Optional)
Groups let you split your listings into batches — for example "iPhone 13" or "iPhone 14" — so you can track each upload, rename it, or delete a whole batch without touching the rest.
- On the Listings page, click New Group.
- Select that group in the Upload to Group dropdown before you upload your CSV.
Quick guide: do I actually need groups?
Short answer: not always. Groups help when you have multiple products that each need their own image set:
Separate groups
Create a group for each product (e.g. "iPhone 13", "iPhone 14"), upload each one separately with its own CSV + images. Fully isolated — easier to rename, delete, or add more of one product later.
Use groups when: you upload in multiple rounds over time, each listing needs a different number of images, or you want a clean tab in the dashboard for each campaign. Otherwise, one CSV with all rows in a single upload is faster.
Skip this if you just want to post one batch. Listings go to Ungrouped and still work the same.
Step 6: Pick Your Accounts & Upload
Go to Listings in your dashboard, choose which account(s) should post, and upload everything at once.
- Open
Dashboard → Listings. - Pick a group in Upload to Group (optional).
- Select your CSV file.
- Select your product images and set Images per listing.
- Under Post from account(s), choose which Facebook account(s) post these listings — pick one, several (a copy is posted from each), or leave it to any running account.
- Click Upload — that's the last thing you do by hand.
What happens next: each CSV row becomes a listing with status pending, and the running extension automatically starts posting them from the accounts you chose. You can still edit title, price, condition, category, and description from the dashboard before a row goes live.
Step 7: Try Test Mode & Set a Safe Posting Pace
Before you go live, use Test Mode to see exactly how the extension would post each listing — nothing is published to Facebook. This is the safest way to confirm your CSV, images, condition, and category all look right.
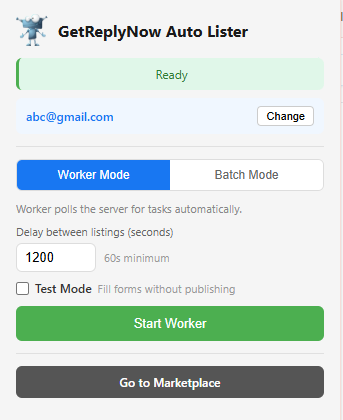
How Test Mode works
- The extension walks through every step of posting — opens the Marketplace form, fills in title, price, condition, category, description, attaches images — all visibly in the browser.
- But it stops before the final Publish click. Nothing is actually posted to Facebook.
- Use it to spot problems early: wrong category, broken image, wrong condition spelling — fix those once in your CSV before you push real listings live.
Recommended posting pace — keep your account safe
Facebook Marketplace watches for unusual posting behavior. Going too fast, or posting too many items in one day, is the #1 reason accounts get restricted or banned. Be patient — this is a marathon, not a sprint.
- Up to 20 listings per day — split a larger CSV across multiple days rather than posting 100 in one session.
- About 20 minutes between each listing — this mimics a real seller posting items one at a time throughout the day, not a bot hammering the form.
- Don't leave it running 24/7 — stop the extension overnight, same as you'd stop posting yourself.
You can configure the delay between listings in the extension. A safer pace means a stable account — which matters far more than posting everything quickly.
Recommended flow: run your first batch in Test Mode → check a few listings visually → turn off Test Mode → let it post 20 per day at ~20 min intervals.
Step 8: That's It — It Posts Automatically
Once your listings are uploaded, the extension automatically picks up your pending listings and publishes each one to Marketplace — from the accounts you chose, at a safe pace so Facebook doesn't rate-limit you. Just keep the extension open and watch the status column update.
Watch the status column
pending— queued, the extension will post it automaticallyprocessing— currently being postedlisted— live on Facebook Marketplacefailed— something went wrong. Click Retry failed to push all failed rows back topending.
Final Step: Need Help?
No matter your plan, contact us at support@getreplynow.com — we're here to help!
Frequently Asked Questions
How many listings can I upload at once?
20 listings per day and each listing in 20 mins delay. This is the safest pace. It's not about using automation, it's the pace Facebook expects.
What language does Auto Lister support?
It works in any language. But when you upload the listings, condition and category values must match the English list above, then our AI will understand and match to your Facebook account.
Can I edit a listing after uploading?
Yes. Click any row on the Listings page to expand and edit title, price, condition, category, and description. Changes apply the next time the extension processes the row.
What happens if a listing fails?
It moves to failed status. Click Retry failed to push all failed rows back to pending, and the extension tries again.
Do I have to start the posting manually?
No. As long as the extension is open, it automatically picks up whatever you upload and posts it from the accounts you selected — you don't click anything to start, and there's no separate button to press.