Facebook Marketplace Auto Reply Guide
Your complete guide to automating Facebook Marketplace conversations with AI-powered responses
GetReplyNow Guide
GetReplyNow automates your Facebook Marketplace replies with AI. This guide walks through each part of the dashboard. New here? The fastest way to get going is the Quick Start.
How it works
- Set up your AI once in Settings — your business info and how you want it to reply.
- Install the Chrome extension — it watches your Facebook Marketplace inbox.
- Go live — the extension replies to buyers automatically, using your settings.
Optionally, give each product its own description so replies are listing-specific.
Sync your FB Marketplace listings
You don't have to import listings to go live — your AI can reply from your shared Business Info. Import them when you want listing-specific answers (recommended if you sell different products).
Auto-fetch with the Chrome extension
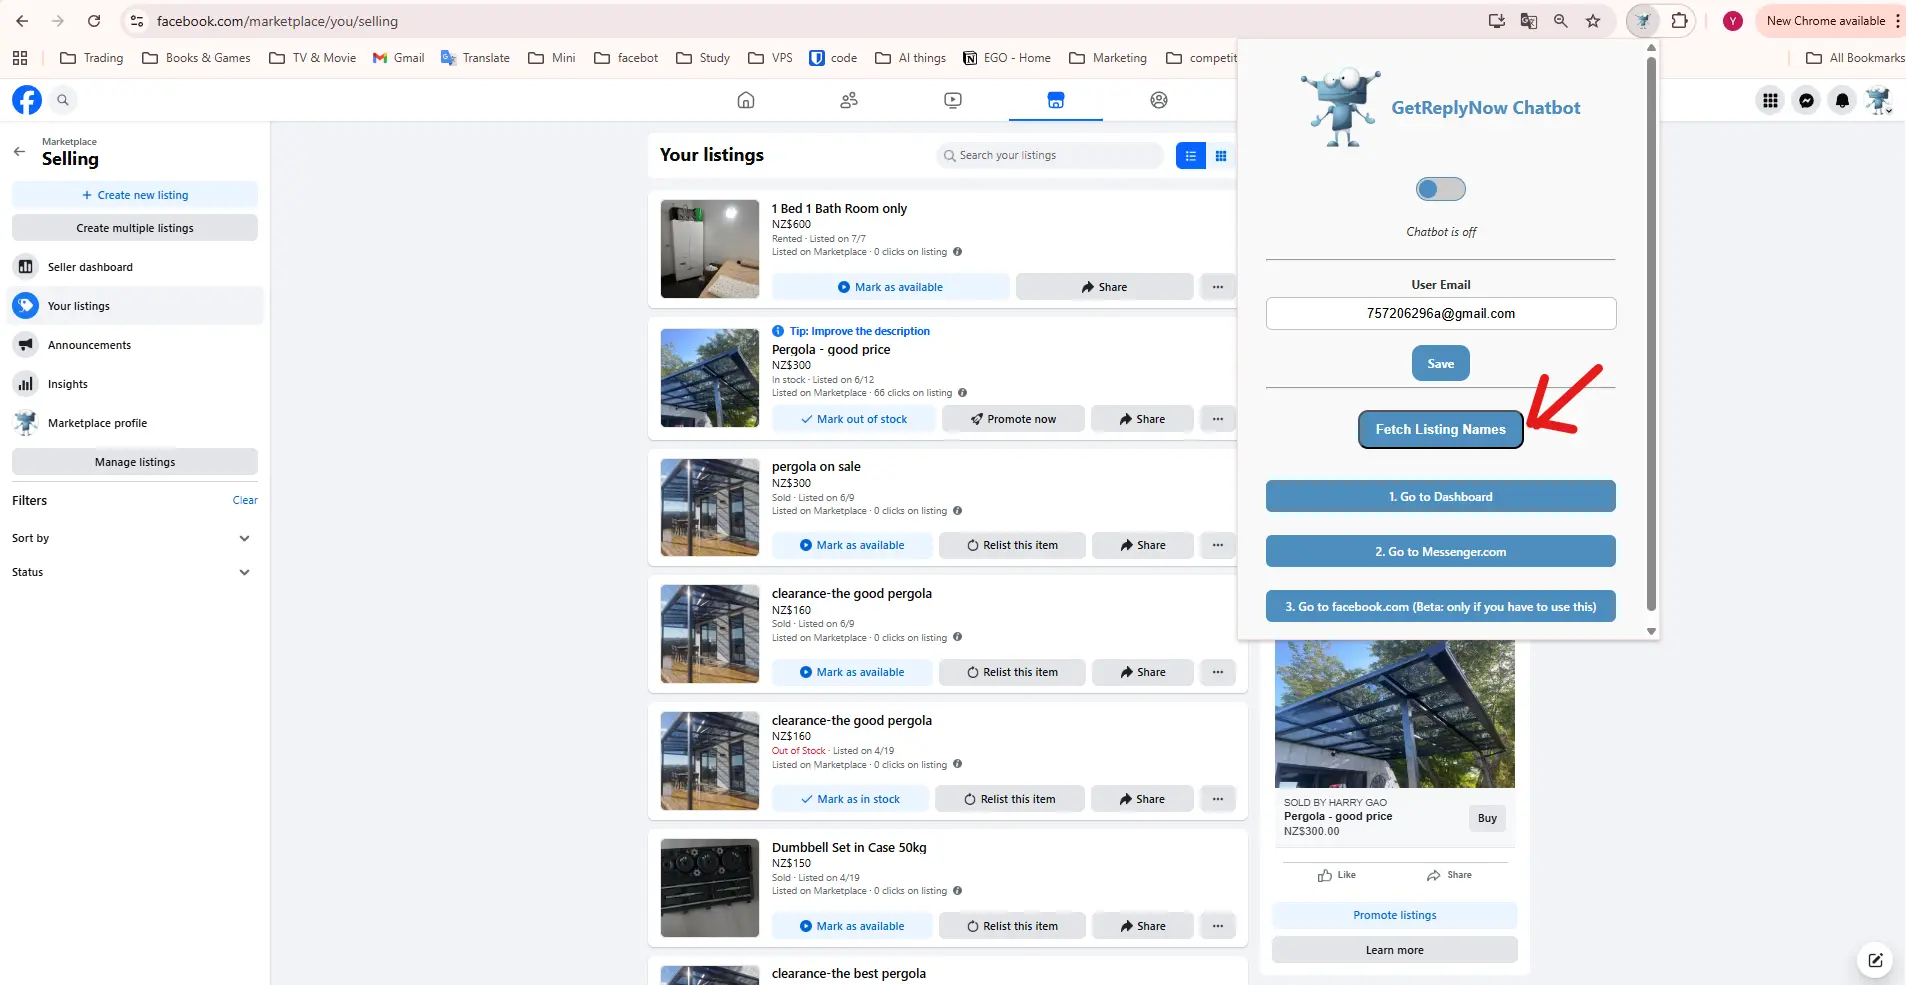
- Open the GetReplyNow extension
- Go to facebook.com/marketplace/you/selling — your active listings page
- Click "Import Listings" in the extension
- Done — your listings are imported with their descriptions and their Facebook item ID
How GetReplyNow finds the right listing
When a buyer messages you, GetReplyNow matches the conversation to one of your listings:
- Item ID first — listings imported with auto-fetch carry their Facebook item ID, so the conversation is matched to the exact listing, even when several listings share the same title
- Title match as fallback — for listings without an item ID (added manually), we look for your listing title inside the buyer's message
- Ignores case and accents — "iPhone 12" matches "iphone 12"
- Picks the most specific match — "iPhone 12 Pro Max" wins over "iPhone"
- Partial matching — the buyer doesn't need to type the exact title
Selling real estate or vehicles? Always use auto-fetch — don't add these listings manually.
Facebook generates the title for property and vehicle listings and doesn't let you edit it, so two different homes can both be called "2 Beds 2 Baths Apartment". Title matching can't tell them apart — but the item ID can. Auto-fetched listings match by item ID, so every buyer gets answers about the exact home or car they messaged you on. Manually added listings have no item ID and will get mixed up in these categories.You can check each listing's status in Settings → Each listing — listings show an ID badge when they're linked, or No ID when they were added manually.
▶ Watch it in action (90 seconds) — real estate setup, from the identical-title problem to item-ID matching:
Auto-import listings
If a buyer asks about a listing that isn't in your dashboard yet, GetReplyNow adds it for you automatically and answers them. You don't have to keep your listings in sync by hand.
What happens
- A buyer messages you about a listing you never imported
- The extension opens that listing on Facebook, using your own signed-in session
- It reads the title, price, description and location, and adds the listing
- It answers the buyer — usually within a few seconds
It's on by default. You'll find it in Settings → ⚙️ App Limits & Controls → Auto-import listings.
Good to know
- It only runs when a buyer asks about something that's missing. It never touches a listing you already have, and never replaces a description you wrote yourself — it only fills in what's blank
- Photos aren't imported. Facebook's item page doesn't tie its images to one listing reliably, so importing them risks attaching a neighbouring ad's photo to your listing. Add photos yourself if you want the bot to send them
- If you're at your plan's listing limit, nothing is added — you'll see a note on your dashboard
- If you're signed out of Facebook in the browser running the extension, it can't fetch the listing. Sign back in and it resumes
- Turn it off if you want the AI to speak only about listings you added yourself
- It isn't used when Same answer for every listing is on — with one shared answer there's no listing to look up
Settings
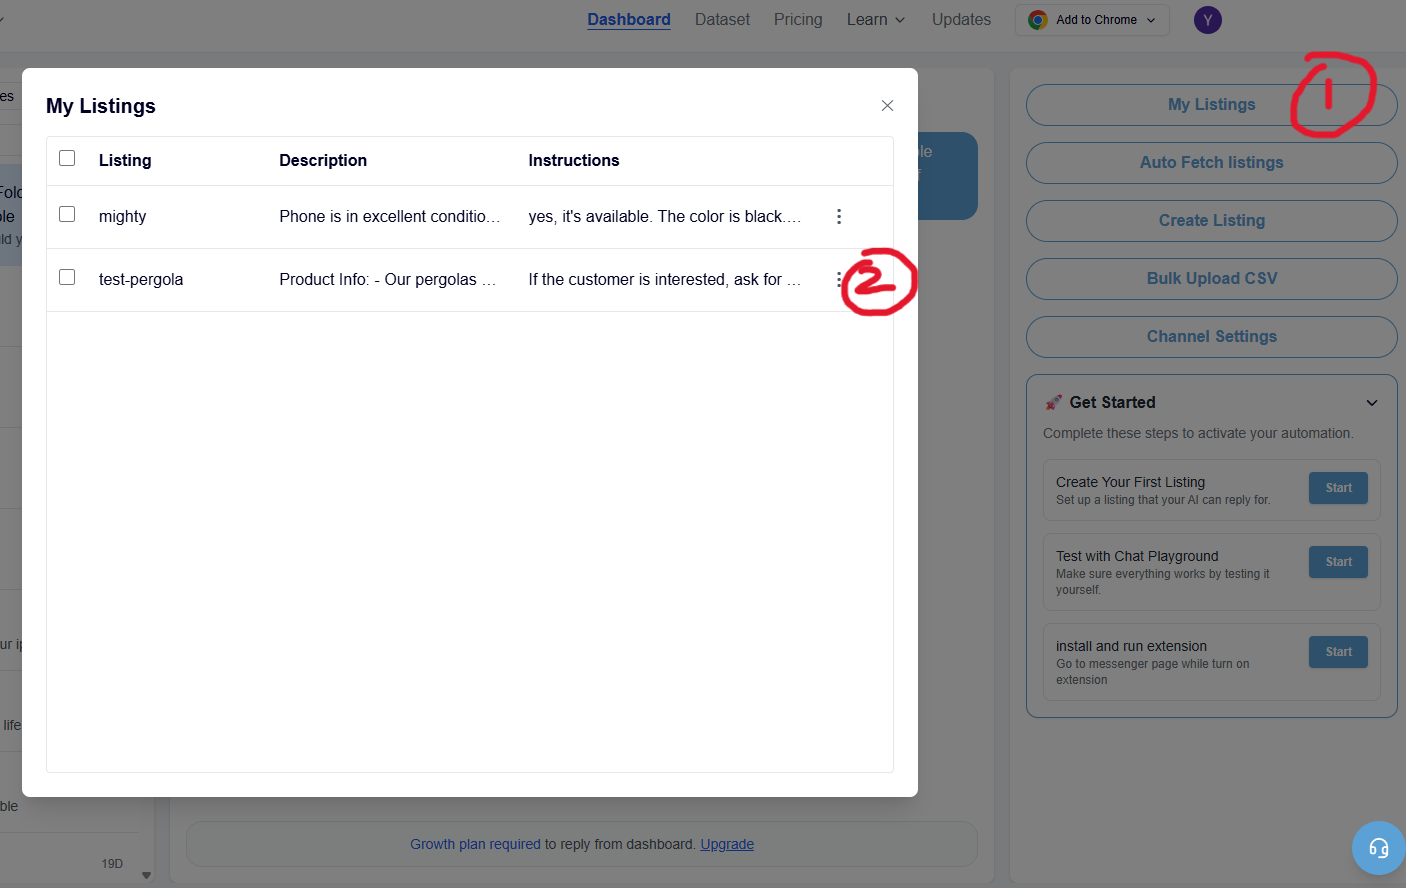
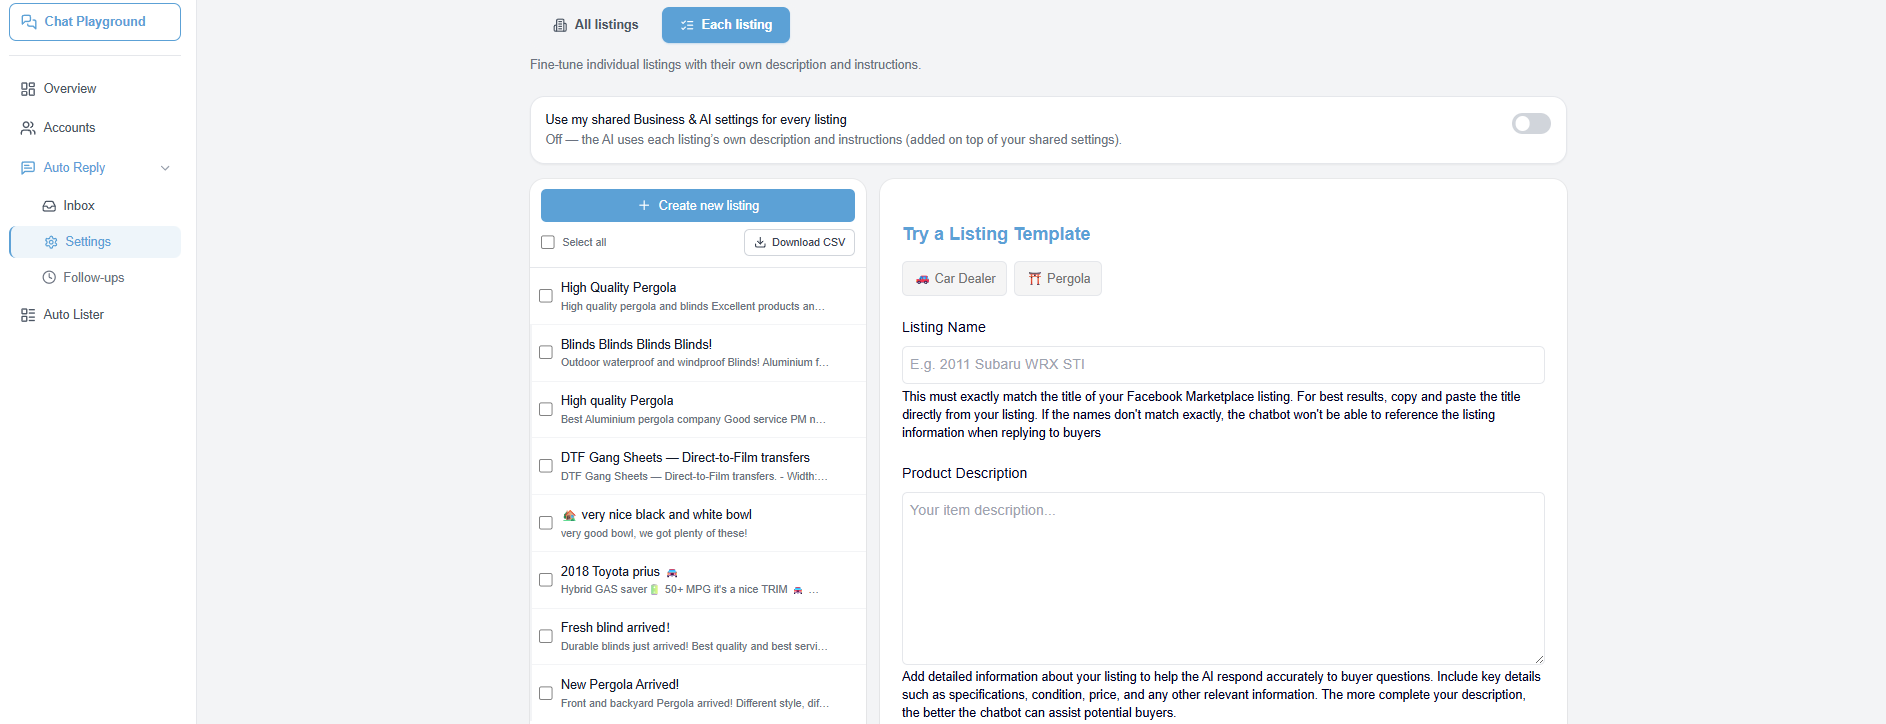
Settings is where you control how the AI replies. It has two tabs — and here's the key idea:
Both tabs have the same core tools — Description, AI Assistant instructions, and Smart Conditions. The only difference is scope:
- All listings applies to every listing. Its description is your shared business info.
- Each listing applies to one product. Its description is that product's details.
Follow-ups are the exception — you set them up once under Settings → Follow-ups and they cover every listing, so there's no separate follow-up to keep per product. See the Follow-Ups section below.
So "Each listing" mirrors "All listings" — same controls, just for a single product. The two stack: your All listings settings always apply, and Each listing adds product-specific detail on top — it never replaces or overrides them.
All listings — shared across every listing
🏢 Business info
Shared detail about your business — name, hours, location, payment, pickup, policies. Auto-fill from Google, use a template, or type it. Optional — skip it if you sell as an individual.
🤖 AI Assistant
How the AI talks and what it does on every listing — for example, always ask for a phone number, book a call, or point buyers to your site. Smart Conditions also live here: situation-specific rules (first message, price questions, high-intent buyers) applied across all listings. Optional and free on the free plan.
Send an image with a condition (Growth plan). A Smart Condition can also attach an image — for example a price list, a spec sheet, or extra photos. Attach one or two images to the condition and, when it fires, the bot sends them right in the chat (before the text). Pair it with the first message trigger to greet new buyers with a photo automatically. Manage your image library per listing or channel-wide from the condition's "Send image" action.
📨 Follow-ups
AI-written nudges for buyers who go quiet — set up once here and used across every listing. You write an instruction, not the message; the AI writes each one. See the Follow-Ups section below.
⚙️ App Limits & Controls
- Disable the Chatbot — instantly pause all replies
- Startup Scroll Depth — how far down your chat list the bot looks for unread messages when it starts (see Advanced below)
- Chat Limit per Buyer — stop the AI after a set number of messages so a human can step in
- Data Link (Webhook) — send your data to Zapier, Make, or n8n
Each listing — a unique reply per product
Open any listing to give it its own description, AI instructions, and Smart Conditions — these stack on top of your shared settings, they don't replace them. (Follow-ups aren't set here — they're configured once for all listings; see below.) The main difference is the description field: under All listings it's your shared business info; here it's that one product's details. Both are sent to the AI together.
This is what lets the chatbot answer accurately about each specific product, instead of giving the same reply to everyone.
There's also a "Use my shared Business & AI settings for every listing" toggle:
- Off (default): the AI matches each listing and uses your business info with its own description
- On: the AI replies from your shared settings only — best if you sell one product (see Advanced below)
Follow-Ups
Most buyers go quiet after a message or two. Follow-Ups send a short nudge after a delay you choose, so those conversations don't die. The key change: the AI writes each follow-up itself — tailored to that specific conversation, and in the buyer's language.
How it works
You no longer write the follow-up text. Instead you give the AI a short instruction — what it should do — and at send time the AI reads the whole conversation and composes the actual message for that buyer. Because it's generated per conversation, the same instruction produces a natural, relevant nudge for everyone, in whatever language they were speaking.
You set this up once under Settings → Follow-ups, and it covers every listing — there's no separate follow-up to keep on each product. The AI still uses the matched listing's details and your business info for the right voice.
Set it up
- Open Settings → Follow-ups and turn it on
- Add one or more delays — send after N hours of no response (e.g.
24 hours, then3 days) - For each, write an instruction — what the AI should do, not the exact words. A sentence is plenty:
Gently check if they're still interested and offer to answer any questions.
- Save — the bot handles the rest automatically
"Don't follow up when…" — the stop rule
Some conversations shouldn't get a nudge at all. Describe those situations in plain language and the AI checks each conversation against them, staying quiet when one matches instead of sending an awkward message:
The buyer already shared their phone number, agreed on a time or place to meet, or said they'll come pick it up.
Leave it blank to always follow up. This one rule applies to all your follow-ups.
Test it on a real conversation first
Open any chat in your Inbox and click 🧪 Test follow-up. You'll see exactly what the AI would send that buyer — or, if it decides to hold back, the reason why. Nothing is sent and nothing is charged, so you can edit your instruction and stop rule and re-run until both feel right against real conversations.
Good to know:
- A follow-up only sends if the buyer has gone silent since your last reply
- The moment they respond, the chain stops for that conversation
- You can chain delays (24h → 3 days → 7 days), each with its own instruction
- Each follow-up costs 1 credit — the same as a reply — whether the AI sends one or decides to stay quiet (it read the whole conversation to make that call either way)
💡 Keep instructions friendly and low-pressure. ⚠️ Don't stack too many — one or two captures most of the value; more starts to feel like harassment and risks Facebook flagging your account.
Leads
Most conversations are just questions. A lead is a conversation worth following up on — a buyer who left their number, asked about financing, or wants to book a viewing. The 🎯 Leads tab (Settings → Leads) lets you tell the AI what you count as a lead, then surfaces those conversations so they don't get lost.
Define what counts as a lead
In the Leads tab, describe — in plain words — what makes a conversation a lead. List several conditions in one box, joined with "or"; the AI reads the whole conversation each reply and flags it the moment any of them match.
Example: "The buyer leaves an actual phone number (at least 7 digits) or email address (contains @), asks about financing or trade-in, wants to book a test drive, or makes a serious offer. Asking us for a number, or saying the words 'phone number' or 'email' without giving one, is not sharing contact."
Put the definition in brackets. A buyer who types "phone number" — asking you for one — can match a rule that says "the buyer shares a phone number", and then the AI thanks them for something they never sent. Adding a bracket that says what counts fixes it: *"shares a phone number (at least 7 digits) or email address (contains @)"*. For lead definitions, add the negative too — "asking us for a number is not sharing contact" — because lead detection needs the extra nudge. The same applies to smart conditions.
Not sure how to start? Click a template — Car sales, Real estate & rentals, or General services — and edit it to fit. Leave the box blank to turn lead detection off.
You can also tick "treat a conversation as a lead when it hits the chat limit" — a long back-and-forth is often worth a human's attention even if nothing else matched.
Work your leads in the Inbox
Open the 🎯 Leads filter at the top of your Inbox to see only your leads, then switch between:
- Open — leads you haven't acted on yet (shown first, so you work the ones that need attention).
- Won — leads that turned into a deal.
- Lost — leads that didn't.
Open any lead and use Mark won 💰 or Lost in the conversation header. As you mark them, your win rate (won ÷ decided) appears next to the filter — a simple read on how many leads become money. Marked leads don't disappear; they just move to the Won/Lost tab.
Lead alerts
So you never miss one, GetReplyNow can tell you the moment a new lead comes in:
- Email — a full copy of the conversation, with the reason it qualified. Turn it on in the Leads tab.
- Webhook — if you've set a webhook URL (Settings → App Limits & Controls), it fires automatically on each new lead, so you can pipe leads into your own CRM or tools.
(Email and webhook alerts are on the Growth plan and up.)
Test it first
In the Chat Playground, play the buyer as usual — when a message would mark the conversation as a lead, you'll see a "🎯 Would be marked as a lead" banner with the reason. Fine-tune your definition against real wording before it goes live.
What each plan gets
Everyone can write a lead definition and see how many leads they're getting — so you always know it's working. How many you can open depends on your plan:
| Free | Starter | Growth and up | |
|---|---|---|---|
| Define a lead + see your lead count | ✅ | ✅ | ✅ |
| Open & mark leads (won/lost) | most recent 1 | most recent 2 | unlimited |
| Email & webhook alerts | — | — | ✅ |
Inbox
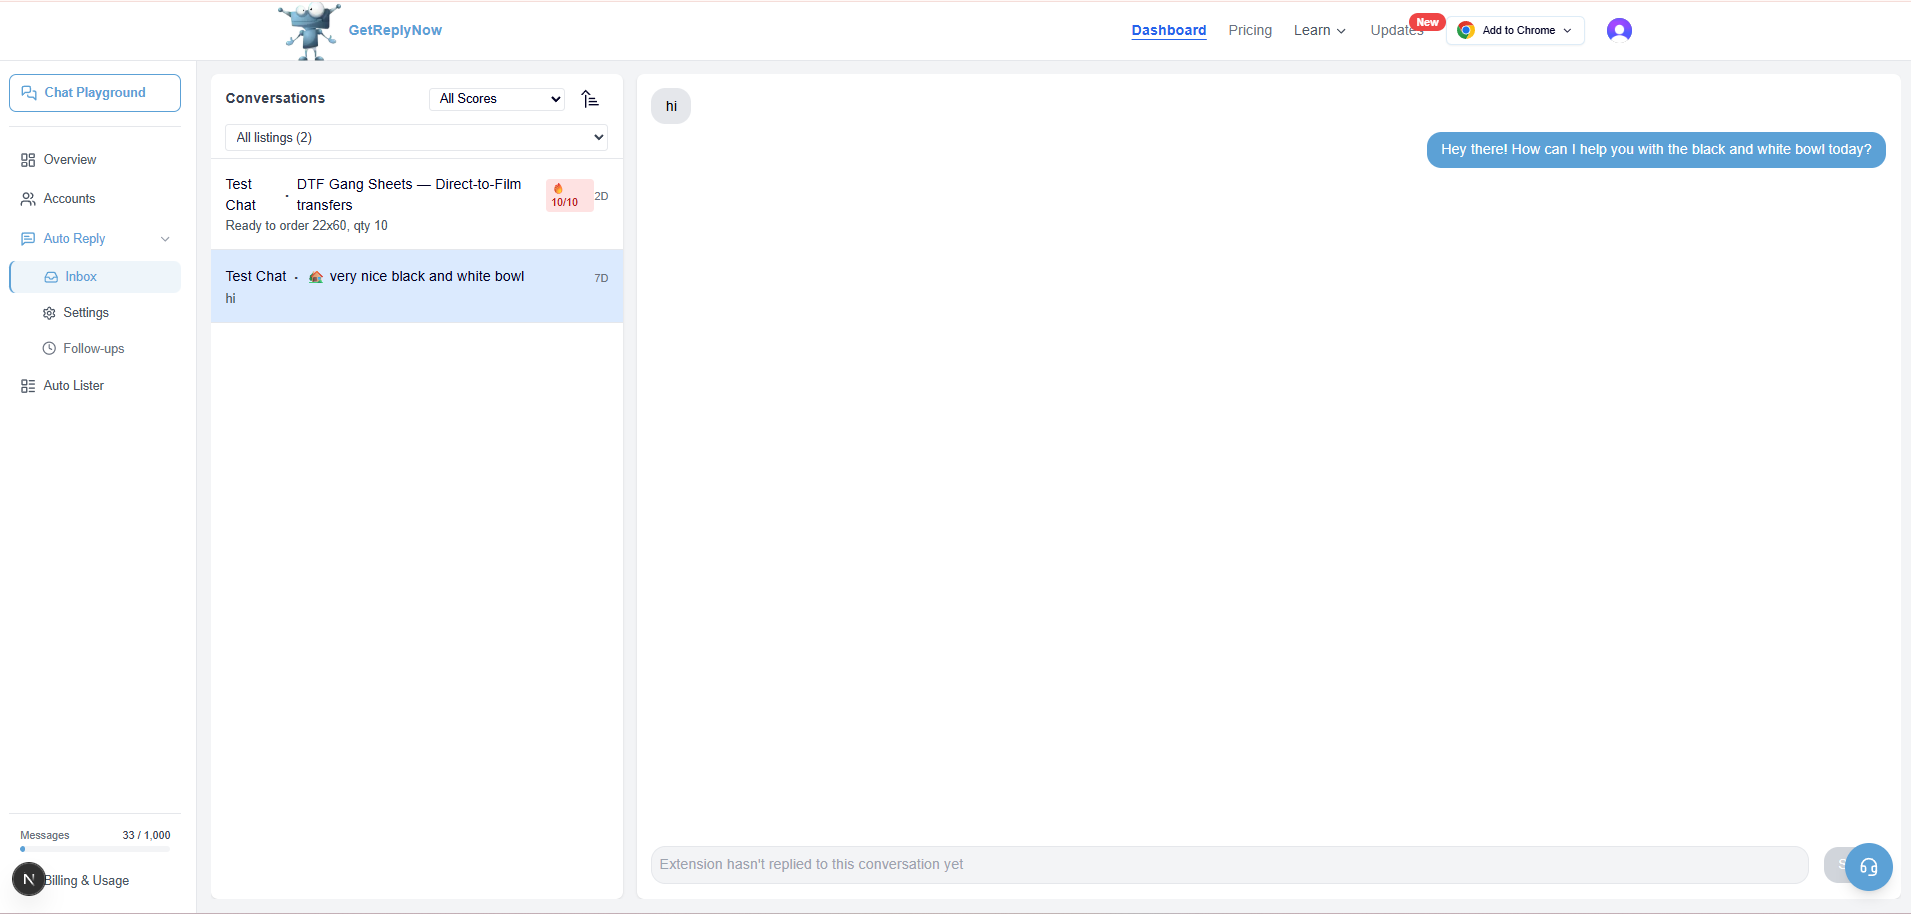
The Inbox is your Facebook Marketplace inbox inside GetReplyNow — every conversation, alongside the replies your chatbot has sent. Use it to monitor how the AI handles real buyers.
Missed buyers
Most of these now fix themselves — see Auto-import listings. When a buyer asks about a listing you never added, GetReplyNow adds it and answers them, and that buyer never reaches this page at all.
Missed buyers is what's left over: the handful auto-import couldn't rescue, and why. Usually one of:
- You're at your plan's listing limit — there's no room to add it. Upgrading fixes every one of these at once
- The listing was deleted or sold on Facebook, so there's nothing left to import
- You turned auto-import off, so we left it alone as you asked
- We couldn't identify which listing the buyer meant
Each row tells you which. It covers the last 7 days.
Each row shows who the buyer is, what they asked, and the listing title from their message. From each one you can:
- Set up listing — opens Settings with the listing title and Facebook item ID already filled in, so all you add is a description. Because it's linked by item ID, the new listing matches that buyer's thread exactly.
- Recover — for buyers who asked before the listing existed. Once it's set up, click Recover and the bot re-opens the chat and answers their original question — in their language, just like a normal reply. A banner at the top can recover all of them at once.
- Resolve — mark a buyer as handled to clear it from the list (for example, if you already replied yourself).
Buyers auto-import already answered don't appear here — this page is only what still needs you.
Chat Playground
Test your replies before going live. Pick a listing, play the buyer, and see exactly how the AI responds. Nothing is sent to Facebook — it's a safe sandbox.
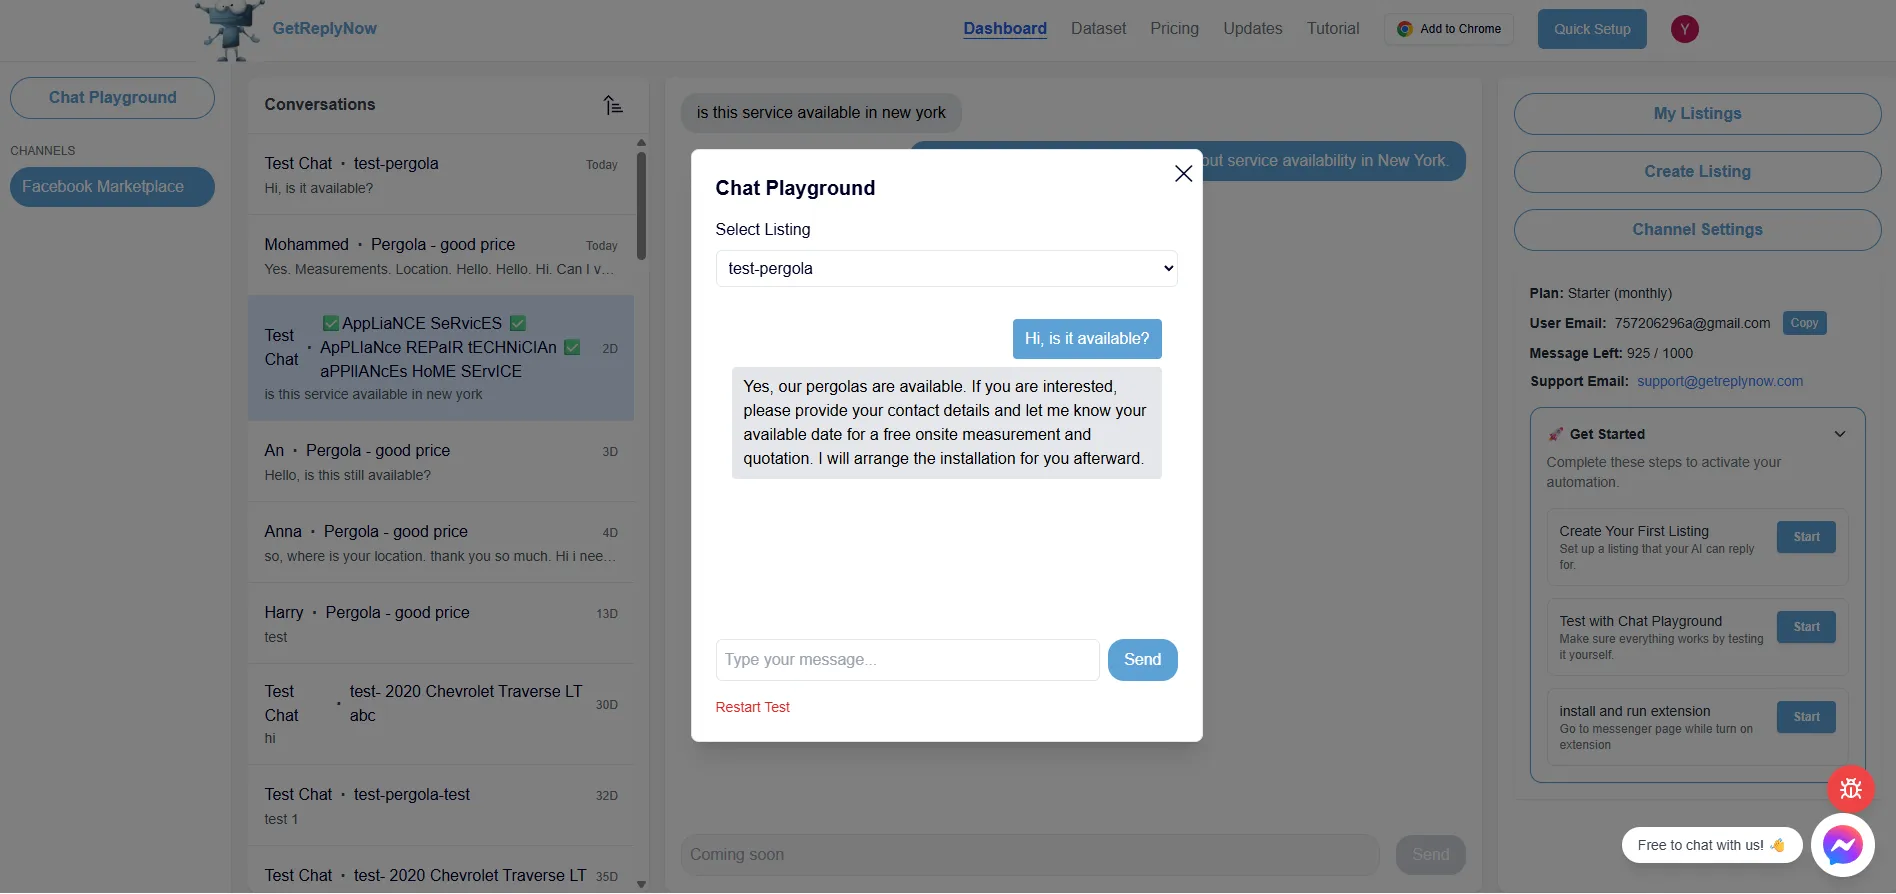
💡 Use it to fine-tune your Business Info and AI Assistant until replies sound like you.
Advanced
Startup Scroll Depth
Facebook only renders the top slice of your chat list — older conversations load as you scroll. So when the bot starts, it scrolls down the list a few times looking for unread messages hiding below the fold. Startup Scroll Depth is how many of those scroll rounds it does.
- Set it in Settings → App Limits & Controls (default 2, max 30)
- Each round is about 2 seconds, so the default adds roughly 4 seconds to startup
- Once the bot is running, new messages arrive at the top of the list and are picked up instantly — this setting only affects the catch-up pass at startup
✅ Raise it if you have a long list of conversations and the bot seems to skip older unread ones after a restart.
💡 The default keeps startup quick, which suits most sellers. High-volume accounts catching up on a backlog can try 6–10.
Same answer for every listing
This switch (on the Listings page) decides whether you need a unique reply per listing.
On — no unique reply needed. Every buyer gets the same answer, built from your shared Business Info & AI Assistant. Best when you sell one service or product line advertised under several listings — financing, a rental service, one model in many ads
Off — a unique reply for each listing, using its own description and instructions on top of your shared settings
✅ Turn it on for: service providers, single-product sellers, or capturing every lead
⚠️ While it's on, the bot also replies to non-Marketplace messages (page DMs, comment triggers), which can cause awkward auto-replies to personal chats
💡 It's also why auto-import sits idle while this is on — with one shared answer, there's no listing to look up
Data Link (Webhook)
Set a webhook URL in Settings → App Limits & Controls and GetReplyNow will POST your conversation data to it as JSON — so you can pipe everything into Zapier, Make, n8n, or your own server/CRM. (Available on the Growth plan and up.)
Every request has the same envelope: a source, a top-level timestamp, and your data under content.
Fires on every reply the chatbot sends:
{
  "source": "GetReplyNow",
  "timestamp": "2026-05-22T12:34:56.000Z",
  "content": {
    "conversationId": 12345,
    "listing": "2 Beds 1 Bath House",
    "nickname": "123 Main St — Unit 3",
    "name": "Sonia",
    "channel": "fb_marketplace",
    "userMessage": "Is this still available?",
    "aiResponse": "Yes, it is! Would you like to book a viewing?",
    "isFlagged": false,
    "timestamp": "2026-05-22T12:34:56.000Z"
  }
}
Fires once when a conversation becomes a lead (has "event": "lead_detected"):
This event carries the whole conversation in a transcript array — so you can create a lead with its full context in one payload (drop it straight into your CRM) instead of stitching together the per-reply messages yourself. It fires on the first turn a conversation qualifies as a lead.
{
  "source": "GetReplyNow",
  "timestamp": "2026-05-22T12:34:56.000Z",
  "content": {
    "event": "lead_detected",
    "conversationId": 12345,
    "listing": "2 Beds 1 Bath House",
    "nickname": "123 Main St — Unit 3",
    "name": "Sonia",
    "leadReason": "Buyer asked to book a viewing",
    "transcript": [
      { "role": "user",  "content": "Is this still available?",              "at": "2026-05-22T12:30:10.000Z" },
      { "role": "agent", "content": "Yes it is! Want to book a viewing?",    "at": "2026-05-22T12:30:12.000Z" },
      { "role": "user",  "content": "Yes, can I come Saturday? 0412 345 678", "at": "2026-05-22T12:34:55.000Z" },
      { "role": "agent", "content": "Saturday works — see you then!",        "at": "2026-05-22T12:34:56.000Z" }
    ]
  }
}
Field reference:
listing— the Facebook listing title (a plain text string).nickname— your private nickname for that listing, if you set one on the Listings page; otherwisenull. Handy when Facebook gives several listings the same title (e.g. real estate) and you want to tell them apart in your own tools. Buyers never see it.name— the buyer's Facebook name.channel— alwaysfb_marketplacetoday.userMessage/aiResponse— the buyer's message and the reply the AI sent.conversationId— a stable ID for the conversation; use it to group messages from the same buyer.leadReason(lead event only) — why the conversation qualified as a lead.transcript(lead event only) — the full conversation up to that point, oldest first. Each entry hasrole("user"= the buyer,"agent"= your auto-reply),content(the message text), andat(its timestamp). The buyer's phone number, questions, and any details they shared live in here — parse it in your CRM to build the lead. The last entry is the reply that triggered the lead.
💡 Your endpoint just needs to accept a POST with a JSON body and return quickly (within ~5 seconds). It doesn't have to return anything — GetReplyNow doesn't read the response.
Need Help?
Our support team is here to help you set up your Facebook Marketplace auto reply system.